Before and After
http://ice-station.com.mx/lid1936.html I’ve had a few questions posed about my use of Photoshop on recent pictures, so I figured instead of spewing more verbal nonsense that no one understands anyway, I’d just post a few before and after shots. These should show, somewhat, how the process I use takes some flat pictures to a new level.
First, here’s a shot straight out of the camera (SOC) of my daughter, Lu, showing us all how incredibly photogenic she is. I think she gets it from me.

Not bad, right? I mean, the subject is obviously a bit hostile, but other than that it seems OK. In focus at least.
I took this picture into my beloved Photoshop in RAW format. If you have a point and shoot camera (one that doesn’t have interchangable lenses), you probably can’t shoot in RAW. The pro to shooting in RAW format is that you can change bits and pieces of the shot before you really begin to alter it. I’m very bad at explaining this, aren’t I? Well, a shorter way to explain this is that if you shoot in RAW, you can make the picture brighter or darker or more vibrant or more shadows all with the click of a mouse. It’s fairly awesome.
Anyway, I tweaked this photo a bit in RAW format, then, once I opened it in Photoshop, I used a plugin called Portraiture to enhance it. This plugin smooths facial tones so you can’t see uneven skin tones and also gives the photo a healthy glow. Then I sharpened the all over photo and ended up with this.

Not bad, eh? The trick is to make the changes subtle. So subtle, that, hopefully, it doesn’t look like you’re a Photoshop pro, but a photography pro. Here they are for better comparison.


More examples? Well, why not. Here is my dog, Molly, right before she flopped over and begged to have her nipples rubbed. Slut.
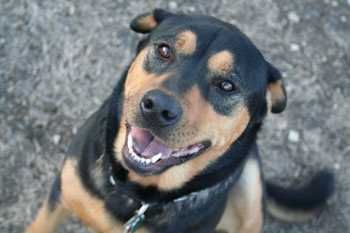
Seriously, right after this she sulked off because I told her that whoring herself out for treats will get her no respect. And I may have mentioned that Rottweilers are supposed to be ferocious and she was embarrassing to the breed. Tough love rules in my house.
So, the picture is a little bit boring. The dog is cute(ish), but, come on, brown grass, no light. Bo-ring. I decided to take the photo, which was shot in JPG, not RAW format, into Photoshop. I tweaked and tweaked, but couldn’t quite get it right. That is, until my beautiful Portraiture plugin took hold. I set the sucker to the Glamour setting, bumped up some colors and vibrance and TADA!
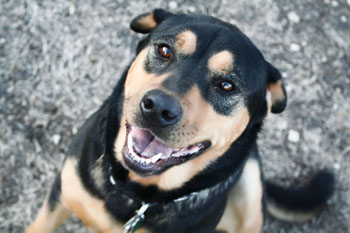
The next candidate for America’s Next Top Model. Looks fierce!
Here they are, together.


Subtle is the word of the day, people. Say it with me! Sub-tle-ty!
OK, one last one. A SOC shot I LOVED of my little family.
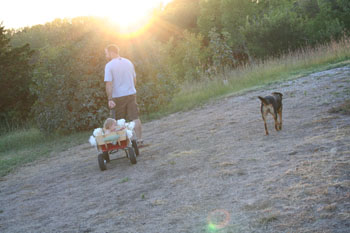
The sunset, the farm, the wagon, the baby, the dog, the bearded husband….sigh. Life is good. But wait, could it be a bit better?
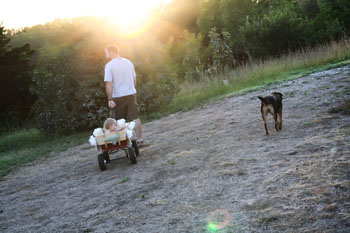
Here are the two of them together.


So, what I really use Photoshop and other camera tools for, is to enhance what’s already there. I don’t want a photo to look so altered you can’t see the details that make it wonderful, I just want it to really reflect what I see, even if it isn’t quite reflected straight out of my camera lens. What do you think? More altering? Less? No more geek talk? Give it to me!


I can only tell a difference on the Lucy pic…but it’s early in the am : (
So can I send you my sucky photos and you make them not look sucky? That would truly be magic!
Mmmm…love the deep green on the last one.